Basic RAG using Elasticsearch
Small writeup on how to do basic RAG using Elasticsearch
Preface
This is quite basic. Up until few weeks ago I didn't know how RAG works, but then saw this HN comment. I'm quite familiar with ES, I've done vector search (step 1) through job and side projects, I've done LLM calls (step 3). So I wanted to try the full RAG, combining the 2 and adding reranking in between.
I'm by no means an authority on the subject
High level overview
RAG I implemented works this way:
- simple semantic search finds 10 relevant chunks of documentation from our database
- Elasticsearch crossencoder reranks those 10 for better relevancy
- we pick top 3 most relevant documents and feed them to LLM along with initial user query and system prompt
- ???
- profit
Chunking
One of the biggest issues is how to do proper chunking. In general it's recommended that chunks are under 512 tokens, which means that documents would often need to be split up into multiple chunks. This guide is very naive about that and will ignore the whole matter (other than setting ingest defaults).
There are a lot of resources online on various strategies. Elasticsearch as well has a blog on it
What we'll do
We'll setup the ES-provided models for semantic search and reranking:
- ELSER for simple semantic search
- Elastic Rerank for cross encoding reranking
I can't give any guidance on how to appropriately chunk documents as it's too structure-specific.
I won't dive deep into the LLM part, but in my project I used Gemini 2.5-flash.
Step by step
- setup Elasticsearch (template/load pretrained models/create ingest and search pipelines)
- insert our documents
- setup our search query
- setup LLM and system query
Elasticsearch setup
Spin up local elasticsearch
Let's spin up Elasticsearch docker container:
docker run \
  --name elasticsearch \
  --rm \
  --memory=8g \
  -e "discovery.type=single-node" \
  -e "xpack.security.enabled=false" \
  -e "xpack.ml.max_machine_memory_percent=50" \
  -p 9200:9200 \
  -p 9300:9300 \
  elasticsearch:9.1.2
Elasticsearch ML stuff is unfortunately behind paid tier even for local development, so we need to start 14-day trial:
curl -XPOST "localhost:9200/_license/start_trial?acknowledge=true"
Note: this doesn't cost anything and you can do it on every instance (if you run multiple projects)
Set up ELSER inference endpoint
Following cURL will create an inference endpoint "rag-elser" using elasticsearch provided ELSER model - which will be used for initial semantic search:
curl -X PUT "http://localhost:9200/_inference/sparse_embedding/rag-elser" \
  -H "Content-Type: application/json" \
  -d '{
    "service": "elasticsearch",
    "service_settings": {
      "model_id": ".elser_model_2",
      "num_threads": 1,
      "num_allocations": 1,
      "adaptive_allocations": {
        "enabled": false
      }
    },
    "chunking_settings": {
      "max_chunk_size": 250,
      "overlap": 10,
      "strategy": "word"
    }
  }'
This will automatically do chunking based on the settings we provided.
Set up Elasticsearch rerank endpoint
Following cURL will set up an inference endpoint "rag-rerank" for cross encoding - which will be used for reranking of the top 10 results from semantic search:
curl -X PUT "http://localhost:9200/_inference/rerank/rag-rerank" \
  -H "Content-Type: application/json" \
  -d '{
    "service": "elasticsearch",
    "service_settings": {
      "model_id": ".rerank-v1",
      "num_threads": 1,
      "num_allocations": 1,
      "adaptive_allocations": {
        "enabled": false
      }
    }
  }'
Set up template
Next we'll setup a template. For the purpose of this, the template will only have 1 field: content
We'll store whole document content into content and Elasticsearch will take care of generating vectors (and chunking based on our rag-elser settings):
curl -X PUT "localhost:9200/_index_template/rag_template" -H "Content-Type: application/json" -d'
{
  "index_patterns": ["documents"],
  "template": {
    "settings": {
      "number_of_shards": 1,
      "number_of_replicas": 0
    },
    "mappings": {
      "properties": {
        "content": {
          "type": "semantic_text",
          "inference_id": "rag-elser"
        }
      }
    }
  }
}'
Note: in reality you would want to have at least additional metadata, such as link to the document. And maybe some chunk info, such as index, title, etc.
Verify
We can verify our template and elser inference point work by inserting a document:
curl -X PUT "http://localhost:9200/documents/_doc/1?pretty" -H 'Content-Type: application/json' -d'
{
  "content": "Lorem ipsum dolor sit amet"
}
'
And retrieve the results:
curl -X POST "http://localhost:9200/documents/_search?pretty" -H 'Content-Type: application/json' -d'
{
  "query": {
    "match_all": {}
  },
  "fields": ["_inference_fields"]
}
'
Insert content
Now you need to write a script that inserts whatever content you'd want it to.
In my case I downloaded the Elasticsearch documentation using Zeal. I then went through docs and vibe coded a solution which parses ".section" content, transforms it into markdown and inserts each section into elasticsearch.
I'll spare the reader the code. You'll need to figure out what and how to insert yourself
Search
The last Elasticsearch step is actually searching our documents.
We can do this with the following query:
curl -X POST "http://localhost:9200/documents/_search" \
  -H "Content-Type: application/json" \
  -d '{
    "retriever": {
      "text_similarity_reranker": {
        "retriever": {
          "standard": {
            "query": {
              "semantic": {
                "field": "content",
                "query": "lorem ipsum"
              }
            }
          }
        },
        "field": "content",
        "inference_id": "rag-rerank",
        "inference_text": "lorem ipsum"
      }
    }
  }'
Here we're using text_similarity_reranker. Inside it we define the query which will retrieve the documents. In this case query will be done using our "rag-elser" inference to turn the user input into sparse embeddings, then search the documents for semantically similar matches. After the documents are retrieved, they will be reranked using "rag-rerank" - crossencoding the user input with each document - to better rank them.
Crossencoding is very inefficient (runs inference on each pair of user query<>document), but far better for actually finding best match.
Feeding the results to LLM
Following the past steps, we now have contents of best ranking 3 documents.
We can then hook up an LLM and provide it with some system prompt and the contents of the last 3 documents.
Here's a system prompt I used:
"""
You are a helpful assistant that answers questions based on the provided documents.

User Query: #{query}

Context Documents:
#{context}

Instructions:
- Answer the user's question based solely on the provided context documents
- If the information is not available in the context, say so clearly
- Be concise but informative
- If citing specific information, mention which document number it comes from
- Use markdown formatting for better readability

Answer:
"""
The #{query} is the user provided input and the context is generated from the content of the 3 documents like this:
"""
Document #{index}
#{content}
"""
The #{index} is the rank of the document (1-3).
Then we can call the LLM, for example Gemini:
curl "https://generativelanguage.googleapis.com/v1beta/models/gemini-2.5-flash:generateContent" \
  -H "x-goog-api-key: $GEMINI_API_KEY" \
  -H 'Content-Type: application/json' \
  -X POST \
  -d '{
    "contents": [
      {
        "parts": [
          {
            "text": #{wholePrompt}
          }
        ]
      }
    ]
  }'
Done. Profit. We're one of the cool kids now
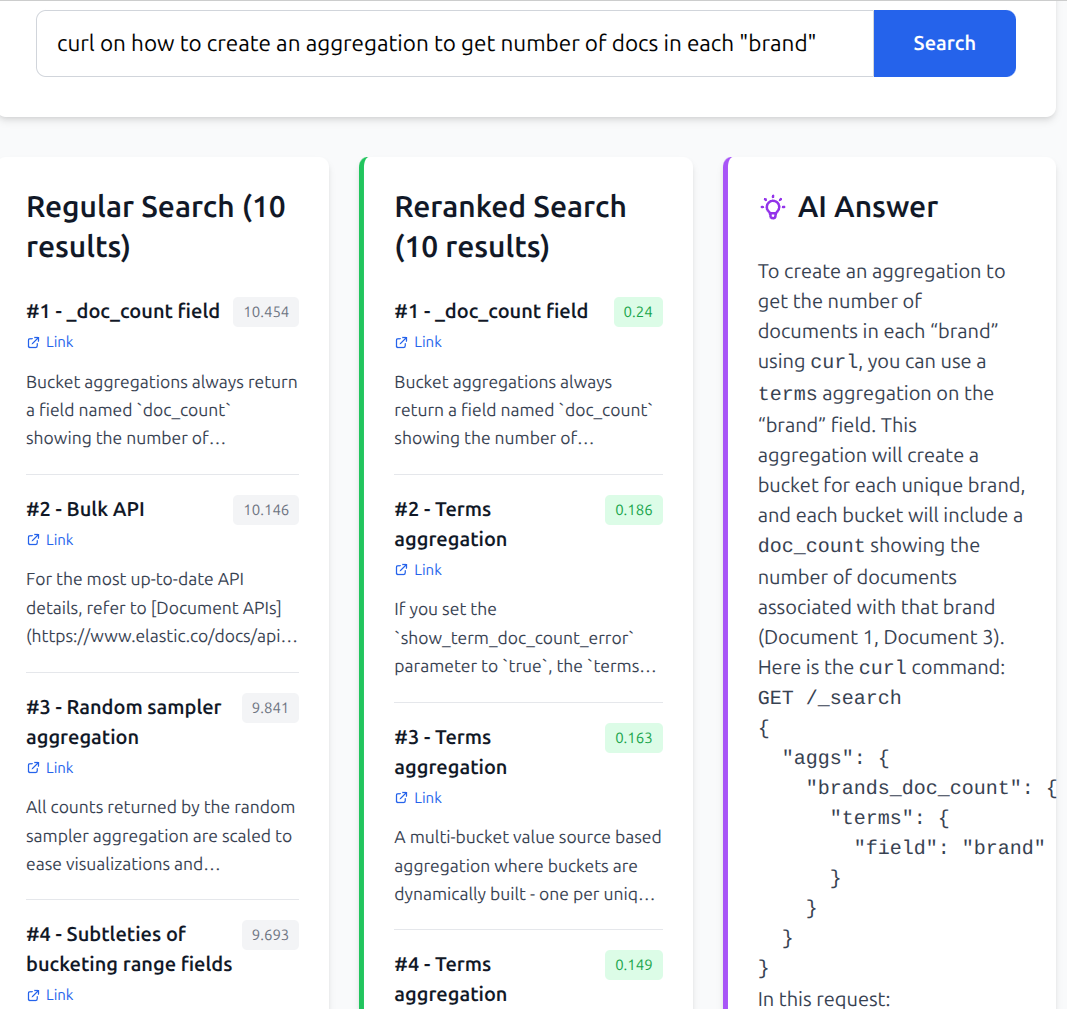
Results
I have also created a small application to display the results. Left column is semantic-only results, middle is semantic + rerank, right is results of feeding top 3 docs to Gemini 2.5 flash.
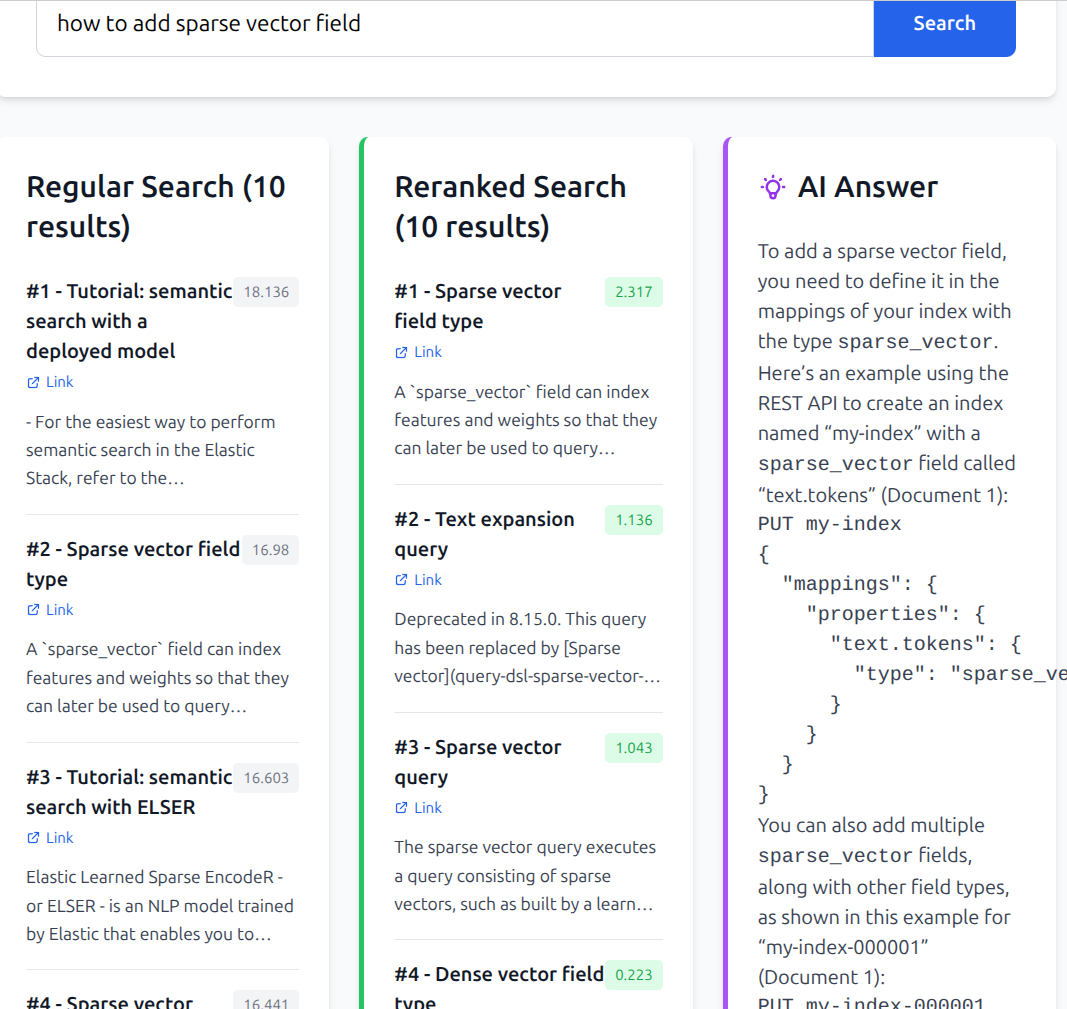
It was a fun experiment. Results are surprisingly good for a very basic setup.
But it must be noted that on my old 13" Thinkpad this is very slow. Executing the whole process takes close to a minute before the results show up.
Nonetheless, fun and definitely useful for various usecases. If the company/you have money to keep this running :)