Creating your own Sublime Text 3 snippets
Help your wrists and boost your day to day productivity with your own Sublime snippets. It's really easy.
There are plenty of Sublime Text packages that provide snippets. But often they just don't cut it for me. Either they use different style (4 space tabs vs 2 space tabs, semicolons vs no semicolons...) or have non-intuitive shortcuts.
There's no reason not to write your own, it's actually really simple and takes a few minutes to write at most.
What is a Sublime Text snippet
A snippet is a shortcut, triggered with tab, that automatically writes some code. Think autocomplete for more than a line of code.
A very basic example that I use is imp autocompleting into
import 1 from '2';
It's triggered by writing imp and pressing tabulator. Then the cursor automatically moves to 1, that let's you write what you want to import and when you press tabulator again, the cursor automatically moves to 2 to let you write where you want to import it from.
Create your own snippet
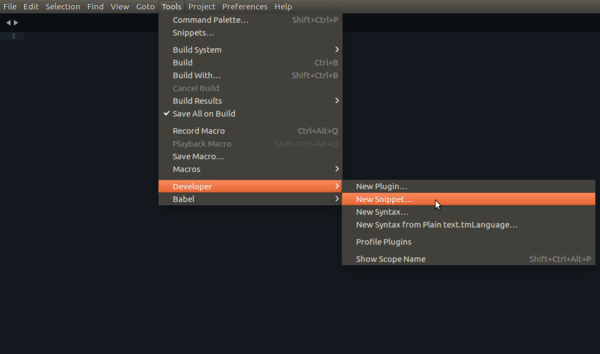
First, open sublime and navigate to Tools > Developer > New Snippet
Which will open an XML template for a new snippet:
<snippet>
    <content><![CDATA[
Hello, ${1:this} is a ${2:snippet}.
]]></content>
    <!-- Optional: Set a tabTrigger to define how to trigger the snippet -->
    <!-- <tabTrigger>hello</tabTrigger> -->
    <!-- Optional: Set a scope to limit where the snippet will trigger -->
    <!-- <scope>source.python</scope> -->
</snippet>
When you are done editing your snippet make sure the file's extension is .sublime-snippet.
Content
content element is the content of this specific snippet. It's wrapped in ![CDATA[...]] content data element.
${1:this} represents where the cursor will be placed after you press the tabulator and ${2:snippet} represents where the cursor will be placed next (after the 2nd time tabulator is pressed). The number represents the order and the word after : is a placeholder word. You can, of course, add more than 2. And number 0 - ${0} is used as the last cursor placement. After all the others are filled in.
Tab Trigger
tabTrigger element is where you define what triggers the snippet.
For example, if you want to trigger it on imp(tab), you simply write
<tabTrigger>imp</tabTrigger>
Scope
scope element is used for scoping the snippet to only certain files.
For example, if you want it to only be triggered in JavaScript files, you'd write:
<scope>source.js</scope>
Refer to this to see how to scope it to certain languages.
Examples
Import example
The whole import example that I use for JavaScript files looks like this:
    <snippet>
        <content><![CDATA[
    import ${1:NAME} from '${2:PATH}';
    ]]></content>
        <tabTrigger>imp</tabTrigger>
        <scope>source.js</scope>
    </snippet>
React simple component example
Another one I use regularly is React simple component:
<snippet>
    <content><![CDATA[
import React from 'react';
import PropTypes from 'prop-types';

const ${1:Name} = () => (
  <${2:DOM}>
    ${0}
  </${2:DOM}>
);

${1:Name}.propTypes = {

};

export default ${1:Name};
]]></content>
    <tabTrigger>rsc</tabTrigger>
    <scope>source.js</scope>
</snippet>
This one is slightly more complex, in that
- it uses
${0}to immediately start writing content - number
${1}and${2}are duplicated. Which is also allowed and it will duplicate the cursor. It's useful for DOM snippets, for example, because the same name is used for opening the element and closing the element
This is basically all you need to get you started. For more advanced snippets and other useful helpers, refer to the official documentation.